Creating a simple UICollectionView in iOS

Steps

1) Create Master-Detail Application & Replace the MasterViewController

First we want to create a Master-Detail Application just because it sets up a Master-Detail relationship even though thats the first thing we are going to break :).  So go ahead and create a new project in XCode4 based on a Master-Detail Application type.  Use ARC, Storyboards and CoreData because we will use CoreData to store information.  Your storyboard should look like this:
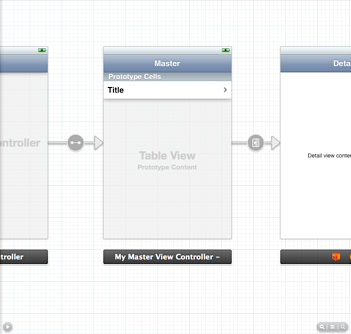
Master-Detail Storyboard

Now select the Master scene until its highlighted in blue and delete it with the Delete key.  We simply replace it by dragging in a UICollectionViewController onto the storyboard in its place.  This places a UICollectionViewController scene with a small empty collectionview cell in the top left corner.  I made a few adjustments to mine and here is what it looks like but Ill go over those later:
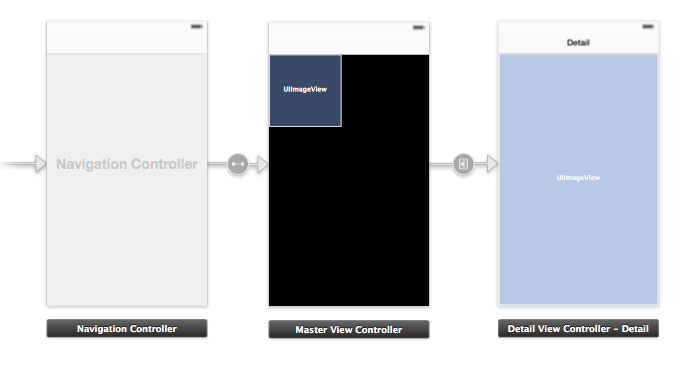
UICollectionViewController Storyboard

The changes I made to it are the following:

a – Select the entire scene (again until its highlighted blue) and change its Class type from UICollectionViewController to MasterViewController.

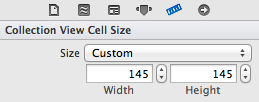
b – Enlarged the UICollectionViewCell from 50×50 to 145×145 in the Dimension’s Inspector

Here are some clips of the Identity Inspector of the MasterViewController and Dimension’s Inspector of the UICollectionViewCell:

UICollectionViewController Identity Inspector
UICollectionViewCell Dimensions Inspector

We did set the new UICollectionViewController to a new class, the MasterViewController class.  We must do the same with the UICollectionViewCell but we must create its class first.

2)  Modify the MasterViewController class with the following in the .m file:

#import “MasterViewController.h”

#import “DetailViewController.h”

#import “MyCustomCell.h”

#import “AppDelegate.h”

static NSString *CellIdentifier = @”MyCustomCell”;

@interface MasterViewController ()

{

NSMutableArray *_objectChanges;

NSMutableArray *_sectionChanges;

}

@end

Now let’s go through the methods.  First the UICollectionView methods, which are quite similar to the UITableViewController methods:

#pragma mark – UICollectionView

– (NSInteger)collectionView:(UICollectionView *)collectionView numberOfItemsInSection:(NSInteger)section

{

id <NSFetchedResultsSectionInfo> sectionInfo = [self.fetchedResultsController sections][section];

return [sectionInfo numberOfObjects];

}

// The cell that is returned must be retrieved from a call to -dequeueReusableCellWithReuseIdentifier:forIndexPath:

– (UICollectionViewCell *)collectionView:(UICollectionView *)collectionView cellForItemAtIndexPath:(NSIndexPath *)indexPath

{

MyCustomCell *cell = (MyCustomCell *)[collectionView dequeueReusableCellWithReuseIdentifier:CellIdentifier forIndexPath:indexPath];

NSManagedObject *object = [self.fetchedResultsController objectAtIndexPath:indexPath];

[cell setImage:[UIImage imageWithData:[object valueForKey:@”photoImageData”]]];

return cell;

}

– (void)prepareForSegue:(UIStoryboardSegue *)segue sender:(id)sender

{

if ([[segue identifier] isEqualToString:@”showDetail”]) {

NSIndexPath *indexPath = [[self.collectionView indexPathsForSelectedItems] lastObject];

NSManagedObject *object = [[self fetchedResultsController] objectAtIndexPath:indexPath];

[[segue destinationViewController] setDetailItem:object];

}

}

The MyCustomCell Class is the one we will create in the next section.  For now we are simply filling in the cell’s image data with some fetched managed object which we will also create later.  A couple of more interesting tidbits for example; we gave our UICollectionViewCell a reuse identifier and we gave our segue an identifier as well.  We must make sure these identifiers also exist in the storyboard inspectors for the cell and segue respectively.

3) Create UICollectionViewCell Class & Connect it

Let’s go ahead and Create a New File in our project, base it off of Objective C Class.  Type in UICollectionViewCell as the subclass and name it MyCustomCell.  We are simply going to define a class for our UICollectionViewCell and once we are finished, we must go to Storyboard and set our cell to use this new class type.

Add a UIImageView property to the class so that your .h file looks like this:

#import <UIKit/UIKit.h>

@interface MyCustomCell : UICollectionViewCell{

IBOutlet UIImageView *imageView;

}

-(void)setImage:(UIImage *)image;

@end

and now implement the setter in your .m so that it looks like this:

#import “MyCustomCell.h”

@implementation MyCustomCell

-(void)setImage:(UIImage *)image{

[imageView setImage:image];

}

@end

4) Create the data model.  First let’s do the easiest part, which is creating the data model.  Select your project’s xcdatamodel file and create a new Entity, call it Snapshots if you’d like.  Now add 3 attributes to it and make them of this type:
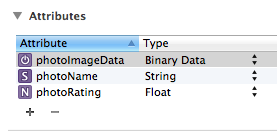
Core Data Entity Data Model

Once that is done, we have a storage container for our data.  Let’s look at the code used by our app to access this store and manipulate it.

#pragma mark – Fetched results controller

– (NSFetchedResultsController *)fetchedResultsController

{

if (_fetchedResultsController != nil) {

return _fetchedResultsController;

}

NSFetchRequest *fetchRequest = [[NSFetchRequest alloc] init];

// Edit the entity name as appropriate.

NSEntityDescription *entity = [NSEntityDescription entityForName:@”Snapshots” inManagedObjectContext:self.managedObjectContext];

[fetchRequest setEntity:entity];

// Set the batch size to a suitable number.

[fetchRequest setFetchBatchSize:20];

// Edit the sort key as appropriate.

NSSortDescriptor *sortDescriptor = [[NSSortDescriptor alloc] initWithKey:@”photoName” ascending:NO];

NSArray *sortDescriptors = @[sortDescriptor];

[fetchRequest setSortDescriptors:sortDescriptors];

// Edit the section name key path and cache name if appropriate.

// nil for section name key path means “no sections”.

NSFetchedResultsController *aFetchedResultsController = [[NSFetchedResultsController alloc] initWithFetchRequest:fetchRequest managedObjectContext:self.managedObjectContext sectionNameKeyPath:nil cacheName:@”Master”];

aFetchedResultsController.delegate = self;

self.fetchedResultsController = aFetchedResultsController;

NSError *error = nil;

if (![self.fetchedResultsController performFetch:&error]) {

// Replace this implementation with code to handle the error appropriately.

// abort() causes the application to generate a crash log and terminate. You should not use this function in a shipping application, although it may be useful during development.

NSLog(@”Unresolved error %@, %@”, error, [error userInfo]);

abort();

}

return _fetchedResultsController;

}

– (void)controller:(NSFetchedResultsController *)controller didChangeSection:(id <NSFetchedResultsSectionInfo>)sectionInfo

atIndex:(NSUInteger)sectionIndex forChangeType:(NSFetchedResultsChangeType)type

{

NSMutableDictionary *change = [NSMutableDictionary new];

switch(type) {

case NSFetchedResultsChangeInsert:

change[@(type)] = @(sectionIndex);

break;

case NSFetchedResultsChangeDelete:

change[@(type)] = @(sectionIndex);

break;

}

[_sectionChanges addObject:change];

}

– (void)controller:(NSFetchedResultsController *)controller didChangeObject:(id)anObject

atIndexPath:(NSIndexPath *)indexPath forChangeType:(NSFetchedResultsChangeType)type

newIndexPath:(NSIndexPath *)newIndexPath

{

NSMutableDictionary *change = [NSMutableDictionary new];

switch(type)

{

case NSFetchedResultsChangeInsert:

change[@(type)] = newIndexPath;

break;

case NSFetchedResultsChangeDelete:

change[@(type)] = indexPath;

break;

case NSFetchedResultsChangeUpdate:

change[@(type)] = indexPath;

break;

case NSFetchedResultsChangeMove:

change[@(type)] = @[indexPath, newIndexPath];

break;

}

[_objectChanges addObject:change];

}

– (void)controllerDidChangeContent:(NSFetchedResultsController *)controller

{

if ([_sectionChanges count] > 0)

{

[self.collectionView performBatchUpdates:^{

for (NSDictionary *change in _sectionChanges)

{

[change enumerateKeysAndObjectsUsingBlock:^(NSNumber *key, id obj, BOOL *stop) {

NSFetchedResultsChangeType type = [key unsignedIntegerValue];

switch (type)

{

case NSFetchedResultsChangeInsert:

[self.collectionView insertSections:[NSIndexSet indexSetWithIndex:[obj unsignedIntegerValue]]];

break;

case NSFetchedResultsChangeDelete:

[self.collectionView deleteSections:[NSIndexSet indexSetWithIndex:[obj unsignedIntegerValue]]];

break;

case NSFetchedResultsChangeUpdate:

[self.collectionView reloadSections:[NSIndexSet indexSetWithIndex:[obj unsignedIntegerValue]]];

break;

}

}];

}

} completion:nil];

}

if ([_objectChanges count] > 0 && [_sectionChanges count] == 0)

{

[self.collectionView performBatchUpdates:^{

for (NSDictionary *change in _objectChanges)

{

[change enumerateKeysAndObjectsUsingBlock:^(NSNumber *key, id obj, BOOL *stop) {

NSFetchedResultsChangeType type = [key unsignedIntegerValue];

switch (type)

{

case NSFetchedResultsChangeInsert:

[self.collectionView insertItemsAtIndexPaths:@[obj]];

break;

case NSFetchedResultsChangeDelete:

[self.collectionView deleteItemsAtIndexPaths:@[obj]];

break;

case NSFetchedResultsChangeUpdate:

[self.collectionView reloadItemsAtIndexPaths:@[obj]];

break;

case NSFetchedResultsChangeMove:

[self.collectionView moveItemAtIndexPath:obj[0] toIndexPath:obj[1]];

break;

}

}];

}

} completion:nil];

}

[_sectionChanges removeAllObjects];

[_objectChanges removeAllObjects];

}

I know its long, but its pretty simple.  The first method, – (NSFetchedResultsController *)fetchedResultsController, basically opens up the store, fetches all entities by the name “Snapshots” and places them into a special object called NSFetchedResultsController.

The didChangeSection method is called when there is a change within a section.  We only have 1 section in our UICollectionView.

The didChangeObject method is called when a particular object is changed within our UICollectionView.

The controllerDidChangeContent actually manages the changes made.  Basically we update our two arrays, _sectionChanges and _objectChanges with each change in the data in order to keep our UICollectionView current.

5) Connect to Flickr API.  So what constitutes a change in those sections and objects?  There is an acronym that datastore managers use, CRUD, which basically says that everytime you create, read, update or delete you create a transaction.  Thats basically what we want to track (except for the read part :)).  So whenever we download a new photo to our datastore, update a photo or delete one, we trigger changes in objects and thus in sections.

We want to use the Flickr API to get images from the web and populate our collection view.  We are basically going to perform a fetch to Flickr API using our own key or identifier.  You must register for one at flickr.com/.

a – Get FlickrAPIKey and add it here to this string constant atop your .m file like so:

NSString *const FlickrAPIKey = @"YOURAPIKEYVALUE";

b – Add the loadFlickrPhotos method to fetch pics from the web.  So add this method:

– (void)loadFlickrPhotos{

// 1. Build your Flickr API request w/Flickr API key in FlickrAPIKey.h

NSString *urlString = [NSString stringWithFormat:@”http://api.flickr.com/services/rest/?method=flickr.photos.search&api_key=%@&tags=%@&per_page=10&format=json&nojsoncallback=1&#8243;, FlickrAPIKey, @”bayern”];

NSURL *url = [NSURL URLWithString:urlString];

// 2. Get URLResponse string & parse JSON to Foundation objects.

NSString *jsonString = [NSString stringWithContentsOfURL:url encoding:NSUTF8StringEncoding error:nil];

NSError *e = nil;

NSDictionary *results = [NSJSONSerialization JSONObjectWithData:[jsonString dataUsingEncoding:NSUTF8StringEncoding]options:NSJSONReadingMutableContainers error:&e];

photos = [[results objectForKey:@”photos”] objectForKey:@”photo”];

for (NSDictionary *photo in photos) {

// 3.a Get title for e/ photo

NSString *title = [photo objectForKey:@”title”];

[photoNames addObject:(title.length > 0 ? title : @”Untitled”)];

// 3.b Construct URL for e/ photo.

NSString *photoURLString = [NSString stringWithFormat:@”http://farm%@.static.flickr.com/%@/%@_%@_s.jpg&#8221;, [photo objectForKey:@”farm”], [photo objectForKey:@”server”], [photo objectForKey:@”id”], [photo objectForKey:@”secret”]];

[photoURLs addObject:[NSURL URLWithString:photoURLString]];

}

// Process into CoreData

[self processCoreData];

}

It basically looks for Flickr photos of Bayern and stores the results in the photos ivar.  Now we must populate our CoreData db with these data.

c – Populate our CoreData model.  Add the processCoreData method to your MasterViewController.m like so:

-(void)processCoreData{

AppDelegate *myDelegate = [[UIApplication sharedApplication] delegate];

for (NSDictionary *photoDictionary in photos){

NSManagedObject *photoModel = [NSEntityDescription insertNewObjectForEntityForName:@”AFPhotoModel” inManagedObjectContext:myDelegate.managedObjectContext];

//[photoModel setValue:[photoDictionary valueForKey:@”rating”] forKey:@”photoRating”];

[photoModel setValue:[photoDictionary valueForKey:@”title”] forKey:@”photoName”];

dispatch_async(dispatch_get_global_queue(DISPATCH_QUEUE_PRIORITY_HIGH, 0), ^{

//Build URL

NSString *photoURLString = [NSString stringWithFormat:@”http://farm%@.static.flickr.com/%@/%@_%@_s.jpg&#8221;, [photoDictionary objectForKey:@”farm”], [photoDictionary objectForKey:@”server”], [photoDictionary objectForKey:@”id”], [photoDictionary objectForKey:@”secret”]];

NSData *imageData = [NSData dataWithContentsOfURL:[NSURL URLWithString:photoURLString]];

dispatch_async(dispatch_get_main_queue(), ^{

[photoModel setValue:imageData forKey:@”photoImageData”];

});

});

}

}

Voila!  Run your app!

iOS7 – UIKit Dynamics

iOS7 Series – UIKit Dynamics


Incorporating UIKitDynamics into your app is pretty simple!  The great thing about it is that you really get the most bang for your buck because the end result has a really big WOW Factor which is certain to impress your users.  Let’s take a quick conceptual drive around UIKitDynamics.

First we adopt the protocol into the ViewController which will implement UIKitDynamics, why?  Well because the objects which will be animated in the end will have to send back a lot of signals like “Hey, I collided with a boundary” or “hey I just hit somebody else and I was going this fast, in this direction”.  In order to receive these messages we use a delegate and its callbacks.

@interface … <UICollisionBehaviorDelegate>

We would need to create the view to animate and the property to reference a UIDynamicAnimator, which is the object in charge of handling animations in UIKitDynamics.

@property (nonatomic, weak) IBOutlet UIView *square1;

@property (nonatomic) UIDynamicAnimator* animator;

Basically we would prep all we need in viewDidLoad, such as instantiating an animator to call the shots inside a particular reference view.  Then we create a behavior or set of behaviors we wish to assign to our animatable view.  We define boundaries so we can keep our objects inside a view.  Finally we add the behaviors to the animator and set the viewcontroller as the delegate as well as set that animator object to our property in order to hold a reference to it.

That’s it!  Now we just sit back and get messages from the animator and the animated view via the callbacks.

– (void)viewDidLoad{

[super viewDidLoad];

UIDynamicAnimator* animator = [[UIDynamicAnimator alloc] initWithReferenceView:self.view];

UIGravityBehavior* gravityBeahvior = [[UIGravityBehavior alloc] initWithItems:@[self.square1]];

UICollisionBehavior* collisionBehavior = [[UICollisionBehavior alloc] initWithItems:@[self.square1]];

collisionBehavior.translatesReferenceBoundsIntoBoundary = YES;

[animator addBehavior:gravityBeahvior];

[animator addBehavior:collisionBehavior];

collisionBehavior.collisionDelegate = self;

self.animator = animator;

}

-(void)collisionBehavior:(UICollisionBehavior *)behavior beganContactForItem:(id<UIDynamicItem>)item withBoundaryIdentifier:(id<NSCopying>)identifier atPoint:(CGPoint)p{

// Lighten the background color when the view is in contact with a boundary.

[(UIView*)item setBackgroundColor:[UIColor lightGrayColor]];

}

-(void)collisionBehavior:(UICollisionBehavior *)behavior endedContactForItem:(id<UIDynamicItem>)item withBoundaryIdentifier:(id<NSCopying>)identifier{

// Restore the default color when ending a contcact.

[(UIView*)item setBackgroundColor:[UIColor grayColor]];

}

Ok so let’s use it in a simple example.  Let’s say we are building a Restaurant rating app.  It’s a single view app with a plain vanilla UIViewController which has these properties connected to those outlets:

@property (nonatomic, strong) IBOutlet UILabel *restaurantName;

@property (nonatomic, strong) IBOutlet UILabel *restaurantAddress;

//STAR RATING

@property (nonatomic, strong) IBOutlet UIImageView *stars1;

@property (nonatomic, strong) IBOutlet UIImageView *stars2;

@property (nonatomic, strong) IBOutlet UIImageView *stars3;

@property (nonatomic, strong) IBOutlet UIImageView *stars4;

@property (nonatomic, strong) IBOutlet UIImageView *stars5;


First let’s create the animator that will handle the animation inside our viewDidLoad:

// Create animator

UIDynamicAnimator* animator = [[UIDynamicAnimator alloc] initWithReferenceView:self.view];

Now we add the views we want to animate to the behaviors we want to implement:

//Create behaviors

    UIGravityBehavior* gravityBeahvior = [[UIGravityBehavior alloc] initWithItems:@[self.stars1,self.stars2, self.stars3, self.stars4,self.stars5]];

UICollisionBehavior* collisionBehavior = [[UICollisionBehavior alloc] initWithItems:@[self.stars1,self.stars2, self.stars3, self.stars4,self.stars5]];

UIDynamicItemBehavior* propertiesBehavior = [[UIDynamicItemBehavior alloc] initWithItems:@[self.stars1,self.stars2, self.stars3, self.stars4,self.stars5]];

propertiesBehavior.elasticity = 5;

Notice that the last behavior is actually created to modify certain physical properties of an object, in this case elasticity.  There are other properties we can modify in this manner.

We can also add specific boundaries but in many cases we will want to simply use the view’s edges as the natural boundaries, so we use this line:

    collisionBehavior.translatesReferenceBoundsIntoBoundary = YES;

Finally we add the behaviors to the animator, set the delegate to self and reference our animator through its property:

[animator addBehavior:gravityBeahvior];

[animator addBehavior:collisionBehavior];

collisionBehavior.collisionDelegate = self;

self.animator = animator;

Finally just add the following delegate callbacks to decide what gets done when a collision occurs:

-(void)collisionBehavior:(UICollisionBehavior *)behavior beganContactForItem:(id<UIDynamicItem>)item withBoundaryIdentifier:(id<NSCopying>)identifier atPoint:(CGPoint)p{

// Lighten the background color when the view is in contact with a boundary.

[(UIView*)item setBackgroundColor:[UIColor lightGrayColor]];

}

-(void)collisionBehavior:(UICollisionBehavior *)behavior endedContactForItem:(id<UIDynamicItem>)item withBoundaryIdentifier:(id<NSCopying>)identifier{

// Restore the default color when ending a contcact.

[(UIView*)item setBackgroundColor:[UIColor grayColor]];

}

That’s it!  There are lots of neat effects you can use but don’t overdo it or your users will sue you for giving them vertigo! J

iOS Smarties :)

iOS & Objective C Smarties Code Snippets by Marcio Valenzuela Santiapps.com
iOS & Objective C Smarties Code Snippets

Everyone loves Smarties!  And much the same way Smarties Candies make you smarter… today we are talking about Code Snippets that make you….er Smarter!  More than a source of cut/paste Objective C source code, this is meant to be a quick reference.  As such, some of these will be incomplete and I will be filling them up as I go along. 

1)   UIAlertView

UIAlertView *internetAlert = [[UIAlertView alloc] initWithTitle:@”No hay farmacias”

message:@”Favor cambie sus parámetros”

delegate:self

cancelButtonTitle:@”Cancelar”

otherButtonTitles:@”Ok”, nil];

[internetAlert show];

2)   NSNotification

//1. Register as observer of notifications in viewDidLoad

[[NSNotificationCenter defaultCenter] addObserver:self selector:@selector(receiveTestNotification:) name:@”TestNotification” object:nil];

//2. NSNotifCtr CLEANUP in viewDidUnload

[[NSNotificationCenter defaultCenter] removeObserver:self];

//4. Post notif to NSNotif in calling method OTHER CLASS

[[NSNotificationCenter defaultCenter]

postNotificationName:@”TestNotification”

object:self];

//3. Method to prove notif received…

– (void) receiveTestNotification:(NSNotification *) notification

{

if ([[notification name] isEqualToString:@”TestNotification”])

NSLog (@”Successfully received the test notification!”);

}

3)   UIActivityIndicator – NSTimer – then completion blocks

//1. Set activity indicator

UIApplication *sharedApplication = [UIApplication sharedApplication];

sharedApplication.networkActivityIndicatorVisible = YES;

//INSERT NSTimer here J

//2. Hide activity indicator

UIApplication *sharedApplication = [UIApplication sharedApplication];

sharedApplication.networkActivityIndicatorVisible = NO;

works the same with an IBOutlet UIActivityIndicator

4)   UISearchBar

UISearchBarDelegate, UISearchDisplayDelegate

@property (strong,nonatomic) NSMutableArray *filteredResultsArray;

@property (strong,nonatomic) IBOutlet UISearchBar *resultsSearchBar;

//UISearch in INIT or LOAD method

// Initialize the filteredResults array with its count of Locations NSManagedObjects

self.filteredResultsArray = [NSMutableArray arrayWithCapacity:[self.originalArray count]];

//ios6 refresh control ONLY

if ([UIRefreshControl class]) {

self.refreshControl = [[UIRefreshControl alloc] init];

[self.refreshControl addTarget:self action:@selector(reload) forControlEvents:UIControlEventValueChanged];

[self reload];

[self.refreshControl beginRefreshing];

} else {

//do nothing

}

//nORIS

if (tableView == self.searchDisplayController.searchResultsTableView) {

return [filteredResultsArray count];

} else {

return [self.originalArray count];

}

//cFRAIP

if (tableView == self.searchDisplayController.searchResultsTableView) {

// IF ITS A SEARCH TABLE…>>>>>>>>>>

//Use filteredResultsArray data

} else {

//Otherwise use self.originalArray

}

5)   Reminders & Events

/////////EVENTS

// SPECIAL CALENDAR OBJECT CLASS

#import <EventKit/EventKit.h>

+(EKEventStore*)eventStore;

+(EKCalendar*)calendar;

+(EKCalendar*)createAppCalendar;

// WHAT IT DOES

static EKEventStore* eStore = NULL;

+(EKEventStore*)eventStore{

//keep a static instance of eventStore

if (!eStore) {

eStore = [[EKEventStore alloc] init];

}

return eStore;

}

+(EKCalendar*)createAppCalendar

{

EKEventStore *store = [self eventStore];

//1 fetch the local event store source

EKSource* localSource = nil;

for (EKSource* src in store.sources) {

if (src.sourceType == EKSourceTypeCalDAV) {

localSource = src;

}

if (src.sourceType == EKSourceTypeLocal && localSource==nil) {

localSource = src;

}

}

if (!localSource) return nil;

//2 CREATE A NEW CALEDNAR FOR ITEMS!!!!!!!!!!!!!!!

EKCalendar* newCalendar = [EKCalendar calendarWithEventStore: store];

newCalendar.title = kAppCalendarTitle;

newCalendar.source = localSource;

newCalendar.CGColor = [[UIColor colorWithRed:0.8 green:0.2 blue:0.6 alpha:1] CGColor];

//3 save the calendar in the event store

NSError* error = nil;

[store saveCalendar: newCalendar commit:YES error:&error];

if (!error) {

return nil;

}

//4 store the calendar id

NSUserDefaults *prefs = [NSUserDefaults standardUserDefaults];

[prefs setValue:newCalendar.calendarIdentifier forKey:@”appCalendar”];

[prefs synchronize]; return newCalendar;

}

+(EKCalendar*)calendar{

//1

EKCalendar* result = nil;

EKEventStore *store = [self eventStore];

//2 check for a persisted calendar id

NSUserDefaults *prefs = [NSUserDefaults standardUserDefaults];

NSString *calendarId = [prefs stringForKey:@”appCalendar”];

//3

if (calendarId && (result = [store calendarWithIdentifier: calendarId])) {

return result;

}

//4 check if calendar name exists

for (EKCalendar* cal in store.calendars) {

if ([cal.title compare: kAppCalendarTitle]==NSOrderedSame) {

if (cal.immutable == NO) {

[prefs setValue:cal.calendarIdentifier

forKey:@”appCalendar”]; [prefs synchronize]; return cal;

}

}

}

//5 if no calendar is found whatsoever, create one

result = [self createAppCalendar];

//6

return result;

}

// ADD ENTRY FROM VC THRU CALEDNAR OBJECT

-(void)addItem:(NSDictionary*)item toCalendar:(EKCalendar*)calendar{

EKEvent* event = [EKEvent eventWithEventStore:[AppCalendar eventStore]];

event.calendar = calendar;

EKAlarm* myAlarm = [EKAlarm alarmWithRelativeOffset: – 06*60 ];

[event addAlarm: myAlarm];

NSDateFormatter* frm = [[NSDateFormatter alloc] init];

[frm setDateFormat:@”MM/dd/yyyy HH:mm zzz”];

[frm setLocale:[[NSLocale alloc] initWithLocaleIdentifier:@”en_US”]];

event.startDate = [frm dateFromString:[show objectForKey:@”startDate”]];

event.endDate = [frm dateFromString:[show objectForKey:@”endDate”]];

event.title = [item objectForKey:@”title”];

event.URL = [NSURL URLWithString:[item objectForKey:@”url”]];

event.location = @”My Office”;

event.notes = [item objectForKey:@”tip”];

//add recurrence

NSNumber* weekDay = [item objectForKey:@”dayOfTheWeek”];

EKRecurrenceDayOfWeek* itemDay = [EKRecurrenceDayOfWeek dayOfWeek: [weekDay intValue]];

EKRecurrenceEnd* runFor3Months = [EKRecurrenceEnd recurrenceEndWithOccurrenceCount:12];

EKRecurrenceRule* myReccurrence = [[EKRecurrenceRule alloc] initRecurrenceWithFrequency:EKRecurrenceFrequencyWeekly interval:1

daysOfTheWeek:[NSArray arrayWithObject:itemDay] daysOfTheMonth:nil monthsOfTheYear:nil weeksOfTheYear:nil daysOfTheYear:nil setPositions:nil end:runFor3Months];

[event addRecurrenceRule: myReccurrence];

//1 save the event to the calendar

NSError* error = nil;

[[AppCalendar eventStore] saveEvent:event span:EKSpanFutureEvents commit:YES error:&error];

//2 show the edit event dialogue

EKEventEditViewController* editEvent = [[EKEventEditViewController alloc] init];

editEvent.eventStore = [AppCalendar eventStore]; editEvent.event = event;

editEvent.editViewDelegate = self;

[self presentViewController:editEvent animated:YES completion:^{

UINavigationItem* item = [editEvent.navigationBar.items objectAtIndex:0]; item.leftBarButtonItem = nil;

}];

}

//////REMINDERS

//EVENT CLASS OBJECT

– (id) init {

self = [super init];

if (self) {

_eventStore = [[EKEventStore alloc] init];

[_eventStore requestAccessToEntityType:EKEntityTypeEvent

completion:^(BOOL granted, NSError *error) {

if (granted) {

_eventAccess = YES;

} else {

NSLog(@”Event access not granted: %@”, error);

}

}];

[_eventStore requestAccessToEntityType:EKEntityTypeReminder completion:^(BOOL granted, NSError *error) {

if (granted) { _reminderAccess = YES;

} else {

NSLog(@”Reminder access not granted: %@”, error);

}

}];

//Initialize the dispatch queue

_fetchQueue = dispatch_queue_create(“com.santiapps.fetchQueue”, DISPATCH_QUEUE_SERIAL);

}

return self;

}

//LOOP THRU CALENDARS

NSArray * allCalendars = [_eventStore calendarsForEntityType:EKEntityMaskEvent |

EKEntityMaskReminder];
NSMutableArray * writableCalendars = [NSMutableArray array]; for (EKCalendar * calendar in allCalendars) {

if (calendar.allowsContentModifications) { [writableCalendars addObject:calendar];

} }

EKCalendar *calendar = eventStore.defaultCalendarForNewEvents;

//CREATE EVENT

//1

EKEvent *event = [EKEvent eventWithEventStore:eventStore]; event.title = @”Hello world!”;
event.startDate = startDate;
event.endDate = endDate;

EKAlarm *alarm = [EKAlarm alarmWithRelativeOffset:-1800]; [event addAlarm:alarm];

event.calendar = eventStore.defaultCalendarForNewEvents;

//2

NSError *err;
BOOL saved = [eventStore saveEvent:event span:EKSpanThisEvent commit:YES error:&err];

if (!saved) {
NSLog(@”Error creating the event”);

}

//REMINDER

//1

EKReminder *reminder = [EKReminder reminderWithEventStore:eventStore];

reminder.title = @”Creating my first reminder”; reminder.calendar = [eventStore defaultCalendarForNewReminders];

NSCalendar *calendar =
[NSCalendar currentCalendar];

NSUInteger unitFlags = NSEraCalendarUnit |

NSYearCalendarUnit | NSMonthCalendarUnit | NSDayCalendarUnit;

NSDateComponents *dueDateComponents = [calendar components:unitFlags fromDate:dueDate];

//1.5. Set the due date

reminder.dueDateComponents = dueDateComponents;

//2

NSError *err;

BOOL success =

[eventStore saveReminder:reminder commit:YES error:&err];

if (!success) {
NSLog(@”Error creating reminder”);

}

6)   Local Notifications

//test notif

NSDate *date = [NSDate dateWithTimeIntervalSinceNow:10];

UILocalNotification *localNotification = [[UILocalNotification alloc] init];

localNotification.fireDate = date;

localNotification.timeZone = [NSTimeZone defaultTimeZone];

localNotification.alertBody = @”I am a local notification!”;

localNotification.soundName = UILocalNotificationDefaultSoundName;

[[UIApplication sharedApplication] scheduleLocalNotification:localNotification];

7)   Sort NSArrays for tableviews

-(void)sort{

NSSortDescriptor *sortDescriptor;

sortDescriptor = [[[NSSortDescriptor alloc] initWithKey:@”distance” ascending:YES] autorelease];

NSArray *sortDescriptors = [NSArray arrayWithObject:sortDescriptor];

NSArray *sortedArray;

sortedArray = [self.annotationsToSort sortedArrayUsingDescriptors:sortDescriptors];

self.annotationsToSort = [(NSArray*)sortedArray mutableCopy];

[self.tableView performSelector:@selector(reloadData) withObject:nil afterDelay:0.5];

}

8)   Contacts

// Read Contact list xml formatted (Array of Dictionaries)

//read directory here

dispatch_async(kBgQueue , ^{

contacts = [NSArray arrayWithContentsOfURL: kContactsList];

dispatch_async(dispatch_get_main_queue(), ^{

[self.tableView reloadData]; });

});

// Do this

//NO ADD THEM TO AB

dispatch_async(kBgQueue , ^{

NSString* request = [NSString stringWithFormat:@”%@?%@”, kContactsList, ids]; //1

NSData *responseData = [NSData dataWithContentsOfURL:[NSURL URLWithString:request]]; //2

//parse vCard data

ABAddressBookRef addressBook = ABAddressBookCreate(); //1

ABRecordRef record = ABPersonCreate(); //2

NSArray* importedPeople = (__bridge_transfer NSArray*)

ABPersonCreatePeopleInSourceWithVCardRepresentation( record, (__bridge CFDataRef)responseData); //3

CFBridgingRelease(record); //4

//define few constants

__block NSMutableString* message = [NSMutableString stringWithString:

@”Contacts imported AB. Add them in Facebook: “];

NSString* serviceKey = (NSString*)kABPersonSocialProfileServiceKey;

NSString* facebookValue = (NSString*)

kABPersonSocialProfileServiceFacebook;

NSString* usernameKey = (NSString*)kABPersonSocialProfileUsernameKey;

//loop over people and get their facebook

for (int i=0;i<[importedPeople count];i++) { //1

ABRecordRef personRef = (__bridge ABRecordRef) [importedPeople objectAtIndex:i];

ABAddressBookAddRecord(addressBook, personRef, nil);

//2

ABMultiValueRef profilesRef = ABRecordCopyValue( personRef, kABPersonSocialProfileProperty);

NSArray* profiles = (__bridge_transfer NSArray*) ABMultiValueCopyArrayOfAllValues(profilesRef);

//3

for (NSDictionary* profile in profiles) { //4

NSString* curServiceValue = [profile objectForKey:serviceKey]; //5

if ([facebookValue compare: curServiceValue] == NSOrderedSame) { //6

[message appendFormat: @”%@, “, [profile objectForKey: usernameKey]];

}

}

//7

CFBridgingRelease(profilesRef);

}

//save to addressbook

ABAddressBookSave(addressBook, nil);

CFBridgingRelease(addressBook);

//show done alert

dispatch_async(dispatch_get_main_queue(), ^{ [[[UIAlertView alloc]

initWithTitle: @”Done!” message: message

delegate: nil cancelButtonTitle:@”OK” otherButtonTitles:nil] show];

});

});

9)   Mapkit

//CHECK LOCATION SERVICES

-(void)checkLocationServices{

BOOL locationAllowed = [CLLocationManager locationServicesEnabled];

if (locationAllowed==NO) {

UIAlertView *alert = [[UIAlertView alloc] initWithTitle:@”Location Service Disabled”

message:@”Re-enable in Settings for this app.”

delegate:nil

cancelButtonTitle:@”OK”

otherButtonTitles:nil];

[alert show];

[alert release];

}

}

//GET LOCATION

-(void)getLocation{

locationManager = [[CLLocationManager alloc] init];

locationManager.delegate = self;

locationManager.distanceFilter = 10;

locationManager.desiredAccuracy = kCLLocationAccuracyBest;

[locationManager startUpdatingLocation];

//- (void)startMonitoringSignificantLocationChanges

_mapView.showsUserLocation = YES;

}

-(void)locationManager:(CLLocationManager *)manager didUpdateLocations:(NSArray *)locations {

self.userLocation = [locations lastObject];

NSLog(@”userLocation is %f, %f”, self.userLocation.coordinate.latitude, self.userLocation.coordinate.longitude);

CLLocationCoordinate2D zoomLocation;

zoomLocation.latitude = self.userLocation.coordinate.latitude;

zoomLocation.longitude = self.userLocation.coordinate.longitude;

NSLog(@”Using %g,%g”, zoomLocation.latitude, zoomLocation.longitude);

//StopUpdating Location so it wont change all the time

[locationManager stopUpdatingLocation];

}

//GET ANNOTATIONS

CLLocation *pinLocation = [[CLLocation alloc] initWithLatitude:annotation.coordinate.latitude longitude:annotation.coordinate.longitude];

CLLocationDistance calculatedDistance = [pinLocation distanceFromLocation:self.userLocation];

annotation.distance = calculatedDistance/1000;

//PLOT ANNOTATIONS

-(void)plotAnnotations{

//Clean out old annotations

for (id<MKAnnotation> annotation in _mapView.annotations) {

[_mapView removeAnnotation:annotation];

}

//THIS LOGS THE LOCATIONSTOSORT ARRAY OF FVC

//NSLog(@”self.myLocationsToSort %@”, self.myLocationsToSort);

for (MyLocation *annotation in self.myLocationsToSort) {

//Add annotation to mapview

[_mapView addAnnotation:annotation];

}

}

– (MKAnnotationView *)mapView:(MKMapView *)mapView viewForAnnotation:(id <MKAnnotation>)annotation {

static NSString *identifier = @”MyLocation”;

if ([annotation isKindOfClass:[MyLocation class]]) {

//test if mapviewnil

if (_mapView == nil) {

NSLog(@”NIL”);

}

MKPinAnnotationView *annotationView = (MKPinAnnotationView *) [_mapView dequeueReusableAnnotationViewWithIdentifier:identifier];

if (annotationView == nil) {

annotationView = [[MKPinAnnotationView alloc] initWithAnnotation:annotation reuseIdentifier:identifier];

annotationView.enabled = YES;

annotationView.canShowCallout = YES;

annotationView.image=[UIImage imageNamed:@”arrest.png”];

} else {

annotationView.annotation = annotation;

}

//instatiate a detail-disclosure button and set it to appear on right side of annotation

UIButton *infoButton = [UIButton buttonWithType:UIButtonTypeDetailDisclosure];

//[infoButton addTarget:self action:@selector(showDetailView:annotationView.annotation) forControlEvents:UIControlEventTouchUpInside];

annotationView.rightCalloutAccessoryView = infoButton;

return annotationView;

}

return nil;

}

//GET ANNOTATIONS

//ZOOM INTO LOCATION

– (void)mapView:(MKMapView *)mapView didUpdateUserLocation:(MKUserLocation *)userLocation {

// We have location, do your logic of setting the map region here.

CLLocationCoordinate2D zoomLocation;

NSLog(@”location in FirstVC %@”, self.userLocation);

//Test if userLocation has a value

NSLog(@”NOCITYSELECTED vDL FVC”);

zoomLocation.latitude = self.userLocation.coordinate.latitude;

zoomLocation.longitude = self.userLocation.coordinate.longitude;

CLLocationDistance visibleDistance = 5000; // 5 kilometers

MKCoordinateRegion adjustedRegion = MKCoordinateRegionMakeWithDistance(zoomLocation, visibleDistance, visibleDistance);

[_mapView setRegion:adjustedRegion animated:YES];

}

//TAP ON PINS – ANNOTATIONS

//Called when disclosure tapped

– (void)mapView:(MKMapView *)mapView annotationView:(MKAnnotationView *)view calloutAccessoryControlTapped:(UIControl *)control{

if (![view.annotation isKindOfClass:[MyLocation class]])

return;

// use the annotation view as the sender

[self performSegueWithIdentifier:@”DetailVC” sender:view];

}

10)                  UICustomization/Appearance

[[UINavigationBar appearance] setShadowImage:[[UIImage alloc] init]];

[self.tabBarItem setTitleTextAttributes:[NSDictionary dictionaryWithObjectsAndKeys:[UIFont fontWithName:@”Futura” size:10.0f], UITextAttributeFont, nil] forState:UIControlStateNormal];

UIImage *gradientImage32 = [[UIImage imageNamed:@”FirstCellLogo.png”] resizableImageWithCapInsets:UIEdgeInsetsMake(0, 0, 0, 0)];

[[UINavigationBar appearance] setBackgroundImage:gradientImage32 forBarMetrics:UIBarMetricsDefault];

[self.tabBarItem setTitleTextAttributes:[NSDictionary dictionaryWithObjectsAndKeys:[UIFont fontWithName:@”Futura” size:10.0f], UITextAttributeFont, nil] forState:UIControlStateNormal];

[[UITabBar appearance] setSelectedImageTintColor:[UIColor redColor]];

11)                  LetterPress Effect

//letterpress effect the label

//NSMutableAttributedString

NSMutableAttributedString *restName = [[NSMutableAttributedString alloc] initWithString:self.attributionText.text];

[restName addAttributes:@{ NSTextEffectAttributeName : NSTextEffectLetterpressStyle, NSFontAttributeName: [UIFont preferredFontForTextStyle:UIFontTextStyleHeadline] } range:NSMakeRange(0, restName.length)];

self.attributionText.attributedText = restName;

12)                  UIGesture

13)                  iCloud

14)                  Library.a

15)                  Instruments

16)                  Checklist App

17)                  UICollectionView & UIContainerView & SplitVC & Popover

18)                  SlideUp

19)                  Raised Tabbar

20)                  Passbook

21)                  AR

22)                  Export Data

23)                  TF

24)                  iAds & AppiRater

25)                  TimeCmoparator – String Parsing

26)                  UIApplicationDelegate sharedApplication & its methods

27)                  NSUserDefaults

// call the store object

NSUserDefaults *prefs = [NSUserDefaults standardUserDefaults];

// set an object for it

[prefs setObject:imageView.image forKey:@”keyToLookupImage”];

// call sync to save it

[prefs synchronize];

NSUserDefaults *prefs = [NSUserDefaults standardUserDefaults];

UIImage *retrievedImage = [prefs stringForKey:@”keyToLookupImage”];

imageView.image = retrievedImage;

28)                  Façade design pattern

29)                  Protocols & Delegates

30)                  InAppPurchases

31)                  Datepicker/uipicker

32)                  NSOperation

33)                  Date Formatter

NSDate *date = [NSDate date];

NSDateFormatter *dateFormatter = [[[NSDateFormatter alloc] init] autorelease];

[dateFormatter setDateStyle:NSDateFormatterShortStyle];

[dateFormatter setTimeStyle:NSDateFormatterFullStyle];

NSString *formattedDateString = [dateFormatter stringFromDate:date];

NSLog(@”formattedDateString for locale %@: %@”,

[[dateFormatter locale] localeIdentifier], formattedDateString);

timeLabel.text = [dateFormatter stringFromDate:date];

34)                  Letterpress Effect

35)                  asd

iOS7 Sprite Kit for Game Design for iPhone & iPad

iOS 7 Series – Sprite Kit

Welcome to iOS7 and to start off, I want to kick things off with SpriteKit.  Although it deals with video games, many companies are using iOS apps as a marketing tactic to engage their users in an effort to promote their products.

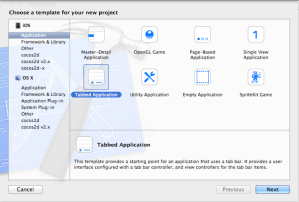
SpriteKit is the most prominent feature in iOS7 so we’re going to take a quick tour.  Go ahead and create a New Project in XCode5 and select the SpriteKit template (the bottom right icon):

iOS7 SpriteKit Basics by Marcio Valenzuela Santiapps.com

Click next and fill in your project data.  Once you are in the main XCode window notice we have the following files in the Project Navigator:

1)   AppDelegate

2)   Main.Storyboard

3)   ViewController

4)   MyScene

If you look in the AppDelegate you will see nothing new, just a UIWindow property.  The Main.Storyboard is even more eerie.  It’s nothing more than a blank scene.  Then you find the ViewController.h file, which basically imports the SpriteKit framework.  If you check in your Target Linked Libraries you can see SpriteKit in linked.

ViewController.m is where things get interesting.

– (void)viewDidLoad

{

[super viewDidLoad];

// Configure the view.

SKView * skView = (SKView *)self.view;

skView.showsFPS = YES;

skView.showsNodeCount = YES;

// Create and configure the scene.

SKScene * scene = [MyScene sceneWithSize:skView.bounds.size];

scene.scaleMode = SKSceneScaleModeAspectFill;

// Present the scene.

[skView presentScene:scene];

}

In viewDidLoad we create an SKView object and assign our viewcontroller’s view to it.  As an SKView type view, we have a property that allows us to display the fps onscreen and another one for viewing the nodes onscreen for debugging purposes.

We now create a second object of type SKScene and instantiate it with the size of our SKView object to make sure it fits.  Then we set the SKScene object’s scaleMode to AspectFill.  Finally we tell our SKView object to present our SKScene object each with its set properties.

There are a couple of extra methods that tell the app to autorotate and returns the supported orientations.

Now let’s move on to the MyScene object created because this is where the magic happens.

-(id)initWithSize:(CGSize)size {

if (self = [super initWithSize:size]) {

/* Setup your scene here */

self.backgroundColor = [SKColor colorWithRed:0.15 green:0.15 blue:0.3 alpha:1.0];

SKLabelNode *myLabel = [SKLabelNode labelNodeWithFontNamed:@”Chalkduster”];

myLabel.text = @”Hello, World!”;

myLabel.fontSize = 30;

myLabel.position = CGPointMake(CGRectGetMidX(self.frame),

CGRectGetMidY(self.frame));

[self addChild:myLabel];

}

return self;

}

First we create an instance of self with the passed in value for size.  Next we set the background color and create a label in order to position it in the middle of the screen.

The next method reacts to screen touches using the well known touchesBegan method.

-(void)touchesBegan:(NSSet *)touches withEvent:(UIEvent *)event {

/* Called when a touch begins */

for (UITouch *touch in touches) {

CGPoint location = [touch locationInNode:self];

SKSpriteNode *sprite = [SKSpriteNode spriteNodeWithImageNamed:@”Spaceship”];

sprite.position = location;

SKAction *action = [SKAction rotateByAngle:M_PI duration:1];

[sprite runAction:[SKAction repeatActionForever:action]];

[self addChild:sprite];

}

}

Here we loop through any touches and get their location as a CGPoint.  Then we instantiate a sprite from a file named Spaceship and set its position to the touch received.  Finally we create a rotating action and run it on the sprite and add that now rotating sprite to our SKScene.  Voila.

However, there is a very important method left out, the update method.  This method gets called every so often, many times a second actually!  So this is the method used to execute our game logic.

So let’s assume we are the Head iOS Programmer for a big soda company and you met with the Marketing Director about making a game to promote your product.  You decide game will be really simple, such as trying to catch a soda can falling from the sky at the beach.  What you need:

a)    A beach backdrop

b)   A soda can

c)    A potential client

d)   You also need a good marketing strategy to go with the game, otherwise playing the game won’t amount to much.  Such a strategy could be whoever makes the most points in the next month, gets a free 24pack or something.  But you better check with your Marketing Director first J

iOS7 SpriteKit Basics by Marcio Valenzuela Santiapps.com
iOS7 SpriteKit Basics
iOS7 SpriteKit Basics by Marcio Valenzuela Santiapps.com
iOS7 SpriteKit Basics
iOS7 SpriteKit Basics by Marcio Valenzuela Santiapps.com
iOS7 SpriteKit Basics Sprites

So let’s go ahead and google some images:

Ok so let’s plop these on screen to make sure the sizes are proportional.  We are going to be making this project for an iPhone Retina screen so the correct beach size should be the complete screen size, which is 960×640.  To put the beach image on the screen, aside from importing it into your project:

iOS7 SpriteKit Basics by Marcio Valenzuela Santiapps.com
iOS7 SpriteKit Basics

We need to add the code.  So let’s move over to our MyScene initWithSize method because that is only called once and we don’t need to change the background for this game after its been created the first time.  First remove the entire code inside the if block and replace it:

SKSpriteNode *background = [SKSpriteNode spriteNodeWithImageNamed:@”beach.png”];

background.anchorPoint = CGPointZero;

background.position = CGPointZero;

[self addChild:background];

This created a sprite called background using the beach image.  It positions the image and adds it to the scene.  If you run it you’ll get a chopped off image because the simulator is positioned vertically.  This is because we didn’t tell the app to only run in landscape mode.  So head over to your Target Settings and uncheck all orientations except Landscape Left.

iOS7 SpriteKit Basics by Marcio Valenzuela Santiapps.com
iOS7 SpriteKit Basics

FIRST NOTE: Orientation must be defined.

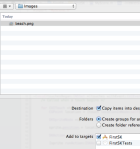
Now run it again and you’ll get a huge image as the background and possibly only part of it being displayed.  This is because you must tell Xcode that the image is to be used in Retina devices.  You do this by renaming the images beach@2x.png.  So go ahead and rename the image in Finder and you’ll have to remove the reference and re-add it as beach@2x.png.  Voila!

iOS7 SpriteKit Basics by Marcio Valenzuela Santiapps.com
iOS7 SpriteKit Basics

Ok so far so good!  Notice we get the node and fps count on the right bottom corner.

NOTE: Retina images are named filename@2x.png

Let’s go ahead and place the cooler on the screen to see if it looks right.  This time remember to rename your images before importing them.  After importing it, let’s add the following code, again in the initWithSize method because we only need to add the cooler once:

// ADD COOLER

SKSpriteNode *cooler = [SKSpriteNode spriteNodeWithImageNamed:@”cooler@2x.png”];

cooler.anchorPoint = CGPointZero;

cooler.position = CGPointZero;

[self addChild:cooler];

Just for your reference, my cooler png is 125×131, almost a square.  I added it and it looks fine:

iOS7 SpriteKit Basics by Marcio Valenzuela Santiapps.com
iOS7 SpriteKit Basics

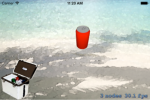
As you can see, node count went up to 2 and fps has no reason to change so far.  There is something important to note here, and it’s that the cooler was added in the bottom left corner.  If you review the code, we set both the background and the cooler’s anchorPoint to CGPointZero, which is equal to 0,0.  This corresponds to the bottom left of the screen.  Thus when we position the cooler, we are telling it to put the cooler’s bottom left corner (its anchor), in the screen’s bottom left corner (its position).

NOTE: CGPointZero in SpriteKit = (0,0) = Bottom Left Corner

Ok now let’s think about the logic.  Both the background and the cooler need only appear once.  The soda can however might need to appear more than once because once the user catches the first one, we probably want to give him a second one to catch, otherwise it’ll be a short and disappointing game.  This is where the game structure gets interesting.  We won’t simply add the soda can in the initWithSize method but rather outsource its creation to a separate method.  Let’s create a method called createSodaCan:

-(void)createSodaCan{

// ADD CAN

SKSpriteNode *can = [SKSpriteNode spriteNodeWithImageNamed:@”sodacan@2x.png”];

can.anchorPoint = CGPointMake(CGRectGetMidX(can.frame), CGRectGetMidY(can.frame));

can.position = CGPointMake(CGRectGetMidX(self.frame), CGRectGetMidY(self.frame));

[self addChild:can];

}

Here we are setting the can’s anchor point to its center and placing it in the center of the screen using CGPointMake and CGRectGetMidX/Y.  However if you run the app there won’t be a soda can anywhere onscreen because we haven’t called it.  One place to call it would be in a method such as the touchesBegan method, but let’s try something different.  In your initWithSize method, add the following code right after the cooler code:

//Delay to call can method

[NSTimer scheduledTimerWithTimeInterval:2.0

target:self

selector:@selector(createSodaCan)

userInfo:nil

repeats:NO];

This basically calls the createSodaCan method after 2 seconds of initializing the scene.  And two seconds after, there it is:

iOS7 SpriteKit Basics by Marcio Valenzuela Santiapps.com
iOS7 SpriteKit Basics

NOTE: Game logic can be fired off from the init method of your scene or from a user interaction method such as the touchesBegan method.

Great!  Now let’s think of what we want to do.  Im thinking we could do something like:

1)   Center the cooler at the bottom of the screen

2)   Move the soda can up to the top

3)   Have the can move from top to bottom

Ok great, so let’s do the first two, which should be quite simple.  Then we’ll worry about moving the can.  The first step is the cooler, so replace the cooler code with:

// ADD COOLER

SKSpriteNode *cooler = [SKSpriteNode spriteNodeWithImageNamed:@”cooler@2x.png”];

cooler.anchorPoint = CGPointMake(CGRectGetMidX(cooler.frame), CGRectGetMidY(cooler.frame));

cooler.position = CGPointMake(self.frame.size.width*0.5, self.frame.size.height*0.01);

[self addChild:cooler];

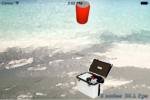
This will place the cooler at 50% the width of the screen and about 1% from bottom to top.  Now do something similar with the can except that we want it to be on top so it can drop:

// ADD CAN

SKSpriteNode *can = [SKSpriteNode spriteNodeWithImageNamed:@”sodacan@2x.png”];

can.anchorPoint = CGPointMake(CGRectGetMidX(can.frame), CGRectGetMidY(can.frame));

can.position = CGPointMake(self.frame.size.width/2, self.frame.size.height*0.75);

[self addChild:can];

This places the can halfway across from left to right and ¾ of the way up the screen:

iOS7 SpriteKit Basics by Marcio Valenzuela Santiapps.com
iOS7 SpriteKit Basics

NOTE: We use relative positioning of an object in the view’s frame to avoid offscreen or misplaced images on different sized screens.

Perfect!  Now how do we animate the can so it can fall?  Well there are two ways, one is using physics, which requires us to create a physics-body object and assign it to the soda can and then “turn on” gravity so to speak.  The much simpler way is to animate the can to go from the top of the screen to the bottom of the screen.

To use the latter, we need SKActions much like the rotate action in the template.  So let’s code some and see what happens.  Well I took a look at the way the template created the rotating action and started typing…XCode took care of the rest.  I reasoned that what I wanted was to “move” the sprite and XCode suggested the following:

//Move the can

SKAction *fallingAction = [SKAction moveByX:<#(CGFloat)#> y:<#(CGFloat)#> duration:<#(NSTimeInterval)#>]

So I went with that and ended up with this code for the createSodaCan method:

// ADD CAN

SKSpriteNode *can = [SKSpriteNode spriteNodeWithImageNamed:@”sodacan@2x.png”];

can.anchorPoint = CGPointMake(CGRectGetMidX(can.frame), CGRectGetMidY(can.frame));

can.position = CGPointMake(self.frame.size.width/2, self.frame.size.height*0.75);

//Move the can

SKAction *fallingAction = [SKAction moveByX:0 y:-400 duration:2.0];

[can runAction:fallingAction];

[self addChild:can];

Well that’s not half bad.  I could’ve used another method such as moveTo instead of moveBy.

Ok now let’s simulate how to actually “catch” the can in the cooler.  What we need is something called “collision detection”.  What we want to do is check to see if the rectangle around the cooler is intersecting with the rectangle around the can.  To do this, we have to do so constantly.  That’s where the update method comes in.  This method is called repeatedly before each frame is drawn.  So we need to ask it if those two rectangles are colliding.  That means we need references to both objects.  To do that we create an instance variable for each, so we add them in MyScene.h:

@interface MyScene : SKScene {

SKSpriteNode *cooler;

SKSpriteNode *can;

}

Now modify the code in initWithSize by removing the type declaration in each line where we create the cooler and the can so they look like:

cooler = [SKSpriteNode spriteNodeWithImageNamed:@”cooler@2x.png”];

can = [SKSpriteNode spriteNodeWithImageNamed:@”sodacan@2x.png”];

And now we can access those objects through their pointers in the update method as well.  So add this line to your update method:

//Check for intersection of frames for collision simulation

[self testCollisionOfSprite:can withSprite:cooler];

This means this line will be called every time the update method fires.  You can even add an NSLog into the update method to get an idea of how many times its called.  Now let’s define the testCollisionOfSprite:withSprite: method:

-(void)testCollisionOfSprite:(SKSpriteNode*)sprite1 withSprite:(SKSpriteNode*)sprite2{

CGRect sprite1Rect = [self getSizeOfSprite:sprite1];

CGRect sprite2Rect = [self getSizeOfSprite:sprite2];

if (CGRectIntersectsRect(sprite1Rect, sprite2Rect)) {

NSLog(@”They collided”);

}

}

Nothing special going on here, we are simply creating a rectangle for each of the 2 sprites passed in and checking if those rectangles intersect.  If they do, we log.  Finally the way we get those rectangles around the sprites:

– (CGRect) getSizeOfSprite:(SKSpriteNode*)sprite{

double sx = sprite.position.x;

double sy = sprite.position.y;

return CGRectMake(sx, sy, sprite.frame.size.width, sprite.frame.size.height);

}

We have a game…almost.  Let’s add some sound and make the can disappear.

Import your favorite sound and add this code right after the NSLog for They Collided:

SKAction *play = [SKAction playSoundFileNamed:@”explosion_small.caf” waitForCompletion:YES];

[can runAction:play];

can.alpha = 0;

As you noticed earlier, the collision happens many times because there is a long trajectory form the moment the rectangles begin overlapping until they stop overlapping.  This results in a repetitive sound, which is annoying.  More importantly if becomes a problem if you want to work with scoring points because if you try to +1 a point when the collision occurs, you actually end up with many more points in total!  So what is usually done in these cases is a work around that creates a BOOL flag from the start and sets it to False.  We do this in MyScene.h:

BOOL collisionOccurred;

then in the createSodaCan method we set it to FALSE:

collisionOccurred = FALSE;

Finally we modify the if test like so:

if (CGRectIntersectsRect(sprite1Rect, sprite2Rect) && !collisionOccurred) {

collisionOccurred = TRUE;

NSLog(@”They collided”);

SKAction *play = [SKAction playSoundFileNamed:@”explosion_small.caf” waitForCompletion:YES];

[can runAction:play];

can.alpha = 0;

}

This way we always check to see if collisionOccurred is FALSE, if it is then we set it to TRUE inside the if, do our stuff, thus collisionOccurred will not be FALSE again until we set it back.

It is a cumbersome solution because then you must make sure you re-set your flag to FALSE everytime you create a new can.  It even worse if you don’t really create more cans.  Many times for memory saving reasons, we simply don’t destroy the original can.  If you noticed I didn’t destroy the node, I simply made it invisible.  The reason is that now I can reuse that sprite again by repositioning it on top and making it visible again thus saving processor power.  This is a very common tactic in games where you want to have lots of enemies or coins or what not and you don’t want to have to create thousands of instances of them.

The other more elegant solution to the collision detection repetition issue is the first method we talked about collision detection.  So let’s try to cover that in as simple terms as possible.

Physics & Collision Detection

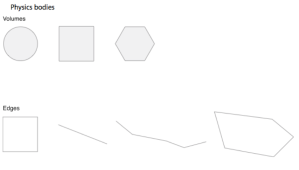
Physics introduces the notion of physical bodies that will be “attached” to our sprite nodes.  Those bodies can be of type dynamic, static or edges.  A dynamic body reacts to physics, static bodies react to physics except forces and collisions because they are meant not to move yet exist in a physical world.  Edges never move and they are usually used to represent boundaries in a game.

iOS7 SpriteKit Basics by Marcio Valenzuela Santiapps.com
iOS7 SpriteKit Basics

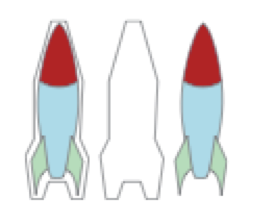
This means that we can try to match a physics body to a sprite node identically, such as:

iOS7 SpriteKit Basics by Marcio Valenzuela Santiapps.com
iOS7 SpriteKit Basics

which results in a very complex physics body to monitor vs simply using a tall rectangle which results in a much easier body to manipulate.  A circle is actually the easiest body to use.

So let’s start off by creating a border around our screen by adding this line at the end of our initWithSize method:

//Create border

self.physicsBody = [SKPhysicsBody bodyWithEdgeLoopFromRect:self.frame];

and in the createSodaCan method add these lines to the end:

can.physicsBody = [SKPhysicsBody bodyWithCircleOfRadius:can.size.width/2];

can.physicsBody.dynamic = YES;

What we have done is create a second physicsBody for the can this time and made it of circular shape and assigned it a dynamic property.  Now let’s remove the line in the update method that calls for testCollisionOfSprite:withSprite: because we don’t need that anymore.  Now run the app and you should see the soda can actually stop near the bottom of the screen which is where the border should be.  But the border is invisible, isn’t it?  Go ahead and comment out the border line in the init method and see for yourself J.

Ok so now let’s remove our line that made the can move from top to bottom:

//[can runAction:fallingAction];

And now let gravity do the work for you, add this line at the end of your initWithSize method:

//Set Gravity

self.physicsWorld.gravity = CGPointMake(0.0, -9.8);

Cool!  But the can didn’t bounce quite so much huh!?  Well that’s probably what a can would do.  But just for fun, let’s say it was a rubber can.  Add this line after the can’s dynamic physicsBody setting to YES:

can.physicsBody.restitution = 0.5;

Neat!  Well but we’re not gonna be covering physics now.  So turn that property off for now.  We just need physics for collision detection.  This is done via collision groups.

First we adopt the SKPhysicsContactDelegate Protocol so we can set out scene as the delegate to receive notifications of collisions:

@interface MyScene : SKScene <SKPhysicsContactDelegate>{

First we set our scene as the delegate in the initWithSize method:

self.physicsWorld.contactDelegate = self;

Now we must set the categories in our can and cooler objects.  So after the cooler sprite creation in the initWithSize method, add this code to create a physics body for it and set its category mask:

//collision physics

cooler.physicsBody = [SKPhysicsBody bodyWithRectangleOfSize:cooler.size];

cooler.physicsBody.dynamic = YES;

cooler.physicsBody.categoryBitMask = coolerCategory;

cooler.physicsBody.collisionBitMask = canCategory;

cooler.physicsBody.contactTestBitMask = canCategory;

So we create a rectangular body instead of a circle and set its category to cooler but its collision mask to canCategory.

Likewise in the can creation method (createSodaCan) we use this code:

//Add physics body to can

can.physicsBody = [SKPhysicsBody bodyWithCircleOfRadius:can.size.width/2];

can.physicsBody.dynamic = YES;

//can.physicsBody.restitution = 0.5;

can.physicsBody.categoryBitMask = canCategory;

can.physicsBody.collisionBitMask = coolerCategory;

can.physicsBody.contactTestBitMask = coolerCategory;

As mentioned before, we set this body as a circle but commented out the restitution property for now.  We set its category to can and its collision mask to cooler.  We must define those categories above the @implementation line like so:

//DONT COLLIDE

static const uint32_t canCategory =  0x1 << 0;

static const uint32_t coolerCategory =  0x1 << 1;

Finally, we override the beginContact method of the protocol which reads:

//COLLISION PHYSICS

– (void)didBeginContact:(SKPhysicsContact *)contact

{

SKPhysicsBody *firstBody, *secondBody;

if (contact.bodyA.categoryBitMask < contact.bodyB.categoryBitMask)

{

firstBody = contact.bodyA;

secondBody = contact.bodyB;

}

else {

firstBody = contact.bodyB;

secondBody = contact.bodyA;

}

if ((firstBody.categoryBitMask & coolerCategory) != 0)

{

NSLog(@”They collisionated!”);

}

}

We pass in a contact, then create 2 body references which will come in as part of that contact.  We set the contact bodies to either one and test for a collision and log something in the console.

Well this is as far as SpriteKit basics can get.  There are more advanced topics such as advanced physics, forces, particles, animations, parallax and raycasting that could be material for a Part 2 should there be enough interest in the subject.

First Android App – Part 6

My First Android App

Android Studio Tutorial by Marcio Valenzuela Santiapps.com
Android Studio Tutorial

Now we are going to receive the input of this message and use the button to send it.

To do so, edit your Button declaration to look like this:

<Button

android:layout_width=”wrap_content”

android:layout_height=”wrap_content”

android:text=”@string/button_send”

android:onClick=”sendMessage” />

We are simply telling it to respond to the onClick button action by calling the sendMessage method.

So we must declare this method in code, of course.  Open your MainActivity.java file and add the following:

/** Called when the user clicks the Send button */

public void sendMessage(View view) {

// Do something in response to button

}

We are declaring a public method that returns void, is called sendMessage and takes a View type to be referenced locally as view.

In order to do this you will need imports such as:

import android.view.View;

Now we are going to have this method declare what is called an Intent.  An intent is an action that we wish to carry out.  We do so by inserting this line into the method:

Intent intent = new Intent(this, DisplayMessageActivity.class);

Here we create a ‘new’ intent for this class to call the DisplayMessageActivity class and we assign it to an Intent type called intent! 🙂

Ok great, but what is this intent going to do?!  Add this code right below:

EditText editText = (EditText) findViewById(R.id.edit_message);

String message = editText.getText().toString();

intent.putExtra(EXTRA_MESSAGE, message);

First we get a reference to our EditText and assign it to a new variable called, rightly so, editText.  We get to our EditText view by finding the view through its id, which is edit_message.  Now we get that editText object and call its getText method concatenated to its toString method.  This converts the editText’s text value into a string.  We are assigning it to a String type variable called message.

Finally we call an intent object’s putExtra method to send that message variable along with an EXTRA_MESSAGE value.

You need 2 more imports here:

android.content.Intent

android.widget.EditText

Now let’s define the EXTRA_MESSAGE inside our MainActivity by adding this line right below the MainActivity public class declaration:

public class MainActivity extends Activity {

public final static String EXTRA_MESSAGE = “com.example.myfirstapp.MESSAGE”;

}

Now add the line that actually calls the new activity and your code should look like this:

public void sendMessage(View view) {

Intent intent = new Intent(this, DisplayMessageActivity.class);

EditText editText = (EditText) findViewById(R.id.edit_message);

String message = editText.getText().toString();

intent.putExtra(EXTRA_MESSAGE, message);

startActivity(intent);

}

Let’s create the second activity by right clicking on our java folder and selecting new Android Activity like so:

Screenshot 2014-02-08 15.49.32

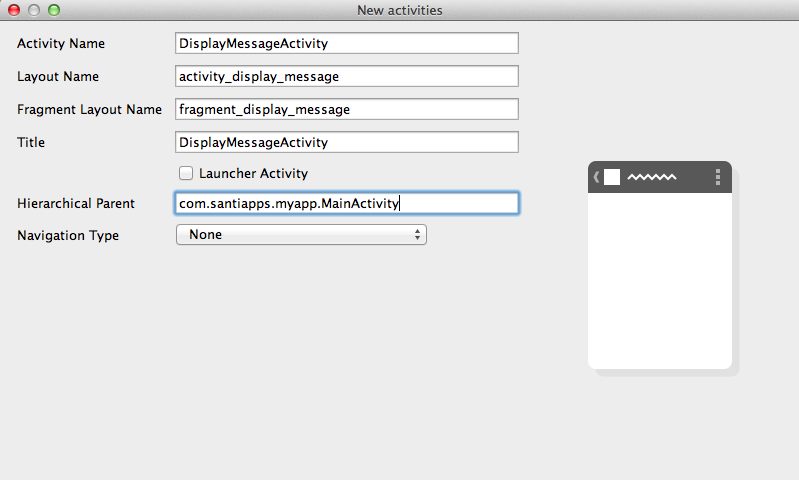
Once again select a Blank Activity, the click Next.  Now fill in the following window as follows:

Android Studio Tutorial Adding New Activity by Marcio Valenzuela Santiapps.com
Android Studio Tutorial Adding New Activity

The Activity Name is self explanatory.  The layout file name is provided for you as are the others but remember that we are not using fragments.  So replace the fragment name again, with the same value as above in the Layout Name.  Leave the Title as is but for Hierarchichal Parent add in the name of the calling activity (MainActivity) preceded by your package name (which you can find in the AndroidManifest.xml in case you forgot.

Also remember to remove that fragment method created by default, Only If Its There!

Trim off some other unused stuff so that the final code looks like this:

public class DisplayMessageActivity extends Activity {

@Override

protected void onCreate(Bundle savedInstanceState) {

super.onCreate(savedInstanceState);

setContentView(R.layout.activity_display_message);

}

@Override

public boolean onOptionsItemSelected(MenuItem item) {

switch (item.getItemId()) {

case android.R.id.home:

NavUtils.navigateUpFromSameTask(this);

return true;

}

return super.onOptionsItemSelected(item);

}

}

We are doing the same thing here, which is call super.onCreate just to make sure something gets created.  Then we set the content view to be connected to this activity’s layout file.

Go to your strings.xml file and add a new string like so:

    <string name=”title_activity_display_message”>My Message</string>

Whenever we create a new activity we must declare it in the AndroidManifest.xml file.  Ours should now look like this:

<application … >

<activity

android:name=”com.example.myfirstapp.DisplayMessageActivity”

android:label=”@string/title_activity_display_message”

android:parentActivityName=”com.example.myfirstapp.MainActivity” >

<meta-data

android:name=”android.support.PARENT_ACTIVITY”

android:value=”com.example.myfirstapp.MainActivity” />

</activity>

</application>

Here we added the DisplayMessageActivity activity and its label as well as its parent.

So with our new activity created and the intent from the calling class, we now need to receive that intent in the new class.  Here is the code:

@Override

public void onCreate(Bundle savedInstanceState) {

super.onCreate(savedInstanceState);

// Get the message from the intent

Intent intent = getIntent();

String message = intent.getStringExtra(MainActivity.EXTRA_MESSAGE);

// Create the text view

TextView textView = new TextView(this);

textView.setTextSize(40);

textView.setText(message);

// Set the text view as the activity layout

setContentView(textView);

}

We again create an Intent object and get the message from the MainActivity.  We then get a TextView reference, set its text size and set its text property to that in the gotten message.  Finally we set the content view to what it needs to be now.

Voila!  Build & Run and enjoy your first android app.

How to create an app – Not programmatically

A fellow coder asked:

“How does one go about developing an app from scratch?  Where does one start?”

Blueprint iOS App Design by Marcio Valenzuela Santiapps.com
Blueprint iOS App Design

My response follows:

Some will say its a matter of style and you have to find your own. And eventually you will, after a lot of copy-paste programming. I started in 2009 and my first app was a copy-paste of a few different projects. All the app did was connect to the Internet, download XML and parse it into a uilabel.

Then I decided to look into more complex app samples. So I downloaded a few from Apple. In particular I remember iPhoneCoreDataRecipes. In hindsight, it was too complex for a beginner but I’m very visual. So the variety of viewcontroller objects made it easier for me to understand. I intentionally stayed away from the coredata logic and took it for granted. I focused on how data was created, passed around and manipulated in the program. I remember I printed out the main class files, about 10 classes in all. Then I started making drawings of each object and tried to decipher who called who and how. That’s when I learned about delegates and protocols. That’s also when I learned to use breakpoints because I went crazy trying to follow NSLogs. It was a great learning experience.

Then I tried following a Stanford course…it helped but it was confusing. So a funny thing happened…I bought Learn Cocos2d by Ray Wenderlich and Rod Strougo.
This is when OOP sank in! Oh yeah, everything is an object!

This was a real eye opener for me. Then I started using SO and the Dev forums which taught me to read the documentation. I learned because for the most part they would all say “Read the docs!!!”. So I was forced to learn how to read documentation. After that I was able to read other docs like Twitter and Cocos2d and many others.

So now when I start a project I grab a pencil and a lot of paper. I start with the business aspects, marketing namely; who is the app for, what others exist, how will they use it, what would the app need to have for those users to like it?

Then I draw viewcontroller objects. Kinda like a huge storyboard with viewcontrollers. This forces me to visually see where the user will start, where data will be created, manipulated and consumed. This way I know which view controller objects need access to data and how they will receive or send it.

Finally I start to write method names of what each view controller will do and how it will interact with other and the data it needs, right below each object in the pencil storyboard.

Only then will I start to code classes. And even when I DO code classes and their methods, I will usually create all empty methods with just comment lines of what a block of code should do. I’ve picked up some personal ideas along the way such as adding an Empty File to be my Journal of what I did each day and what to do the next time I open a project. I also use #warning #PENDING lines to call attention to the comment lines which say what to do but needs to be done in each class.

When in designing the pencil storyboard I’ll usually google for third party libraries that can do certain things that perhaps apple’s native ios sdk won’t do.

Looking at sample code helps a lot. It teaches you some basic patterns like how to use singletons to connect to resources or synchronize data stores and use blocks or protocols to communicate efficiently.

In the end you will develop your own style and procedures. I believe time is the answer you’re looking for. 🙂

ObjC Programming

The basics of Objective C programming for iOS apps by Marcio Valenzuela Santiapps.com
The basics of Objective C programming for iOS apps

The Big Picture

ObjC is OOP which means objects send messages to other objects. Before getting into messages, let’s define objects.

Objects.
This is very diverse. An object can be a string, a number, a Boolean, an integer, an array, a dictionary or even one you create yourself. There are any types of objects but let’s start at the root object.

The root object is called NSObject. You’ll see references to it in code but you’ll hardly ever use it directly. This is called the root object because it’s the starting point of any object. It’s like Adam and Eve rolled into one and ANY other kind of object in ObjC comes from it. An NSObject is defined as an object that takes un space in memory and that’s about it. Because any object will take up space, right? Now think of NSObject as sitting at the top of a family tree and all it’s descendants come from that point and thus share it’s traits, which is to say, any object takes up space.

Now we can think of objects as those already created for us and those we create. Objects created for us are such as NSString where we can ‘store’ text, NSNumbers where we can store numbers, NSDate for dates, NSArray for a sort of list of objects, NSDictionary for a sort of dictionary list where a key (word) has one corresponding value (definition), UIButton for buttons, UILabels for text labels, UIImageViews for images,UIWebViews for HTML pages, UIView for views and UIViewControllers for view controllers.

The first pre-made objects mentioned up to NSDictionary, can be thought of abstract objects. The next few objects I mentioned from UIButtons to UIViewControllers can be thought of more concrete and visible objects because you can actually see those objects in the resulting program or app. As you can see they have the prefix UI which refers to UserInterface whereas NS stands for NeXTSTEP.

Just to clear up the last few objects, an iOS app has 1 window. That one window usually has 1 UIView and every UIView requires a UIViewController which basically controls what happens in that view and how the user can interact with it.

So those are 2 categories of pre-made objects; abstract ones and concrete ones that basically have a graphical representation at runtime.

Now there are the objects we create ourselves. If I’m working on a Contacts app, I will probably create a special object to handle all the information related to a contact. What I will usually do is subclass (or use a more basic but the most related object) to create a foundation for my contact object. NSObject is the most basic object so I will subclass NSObject and add the things I think I might add to NSObject to best represent my info needs. So I might add a few NSStrings to hold first and last names as well as company and perhaps nickname. I might add NSNumbers to hold phone numbers, an NSArray of NSStrings for emails and so on. In the end, my Contact object would be based on NSObject but would represent a unique kind of object which I would call Contact instead of NSObject.

If on the other hand I needed to create an object that had more in common with a button than with an NSObject, I would subclass UIButton. If my object needed to be more like a special text label, I would subclass UILabel.

Ok so once I have all the objects I need, I need those objects to send messages. Objects need to send messages to communicate and they need to communicate in order to carry out tasks. Let’s call those messages methods. And let’s think of an object sending a message by calling a method. So for example, pre-made objects have pre-made methods in order to send pre-made messages.

For example; NSString has a pre-made method called capitalizedString. So how does it work? Well the format is:

[object methodName];

This calls the method called “methodName” on the object called “object”. We say that we are sending the “methodName” message to the “object” object. It just so happens that if your object is the hello world string:

object = @”hello world”;

Then the result of that message would be:

HELLO WORLD

So how do we know what objects there are and what their methods are?

Apple developed the OS and has its documentation. It’s pretty cool because it’s OOP so there is a manual for every object and here is the one for NSString:

https://developer.apple.com/library/mac/documentation/Cocoa/Reference/Foundation/Classes/NSString_Class/Reference/NSString.html

It has a lot of methods because it’s a very basic object. Ok so that’s a look at a pre-made abstract object. You can look at others such as NSArray and you’ll see it has methods consistent with things you might expect to do with a list, such as count which returns the number of objects in a list or addObject which adds a new item to a list and so on.

If you take a look at the pre-made concrete objects such as UIButton:

https://developer.apple.com/library/ios/documentation/uikit/reference/UIButton_Class/UIButton/UIButton.html

you’ll see methods like titleForState: which will set the button’s title for a particular state (selected or not). You will also notice some things called properties. Those are things like the button’s tintColor or enabled.

Ok, so what does it all mean Basil?

Well in an app, you are given a main window. You can add objects to that window such as a UIView and a UIViewController. The UIView may have a backgroundColor set to blue and a certain size. You may also want to tell that view that when the view loads, it should present a UIAlertView, which are those pop up views you see in iOS apps, that reads “Welcome user!”. To do that you need to add a special object called UIViewController. Then you might want to add a UITextField for the user to enter a code and a UIButton for the user to tap on once he/she is done to check if the code is correct. The code might be stored in an NSString object in order to check of its valid.

So how you do all this? In each object’s corresponding Class file set. Each object has a class file set consisting of an interface (.h) and an implementation(.m) file. The interface typically defines that object’s properties and methods whereas the .m file has the implementation of each method. So the .m contains the bull of the code.

A typical class file set might look like this:

@interface MyContact : NSObject

@property (nonatomic,strong) NSString *firstName;
@property (nonatomic,strong) NSString *lastName;
@property (nonatomic,strong) NSString *email;
@property (nonatomic,strong) NSArray *phoneNumbersArray;

-(void)callContact;

-(NSArray*)listOfNumbers;

@end

And then in the .m you might have:

@implementation MyContact

-(void)callContact{
//some code to bring up the Phone app and pass it the main phone number}

-(NSArray*)listOfNumbers{
//return the list of all this contact’s phone numbers
return phoneNumbersArray;
}

To make an app you would need to create a view with its viewcontroller and add a MyContact class to create contacts and combine messages from the viewcontroller class to the MyContacts class and vice versa in order to make the app interact with the user.

Static Libraries in iOS – Video Tutorial

Static Library for iOS by Marcio Valenzuela Santiapps.com
Static Library for iOS

Libraries is another one of those rather obscure topics for newbie programmers, kinda like Blocks and Delegates/Protocols.  Think of libraries as just that, a resource you can use which doesn’t belong to you.  A loaner 🙂

NOTE: If you need a nice tutorial on Blocks or Delegates, check out:

Video Tutorial: Objective-C Blocks

Video Tutorial: Objective-C Protocols and Delegates

Ok back to our tutorial!  Well a library is a piece of code that you can use (by importing it into your projects) but its not yours, so you can’t really do what you want to that piece of code, except use its functionality.  In this tutorial we will create our own library and then import in into another project for its use.

The basic steps are:

1. Create your code. Usually Class method laden classes that create no state! Project must be CocoaTouch Library Framework.

2. Compile and create .a file.

3. Import that .a file into new projects.

In order to show you I prepared this small video:

StaticLibraryTut

For a more complete tutorial you can visit RW.com’s Creating a Static Library in iOS tutorial at:

http://www.raywenderlich.com/41377/creating-a-static-library-in-ios-tutorial

OAuth & PKI for Dummies

I’ve been programming for a few years and I’ve heard of PKI and OAuth for a while. I’ve read about it in SSL certificates for servers and even installed certificates. I’ve signed many apps with certificates and I’ve granted access to many others for Facebook or Twitter interaction.

I’ve looked around for definitions or explanations lately and came up empty handed. So I’ve put together this article to not only explain it but to try and make sure I DO understand as much as I think I do and point out the parts I DONT!

What OAuth is and what isn’t!

It’s not a login replacement. Logging into apps is still dome through usernames and passwords as surely you’ve noticed. What it is, is a safer way to grant partial, more fine grain access to data.

Surely you’ve noticed how authorizing an app to access your Facebook asks for your consent to specific parts of your data and only some tasks.

Examples

Facebook and Twitter are probably the most common examples of a third party app requesting access to your data.

Ground Zero

Here is what the field looks like. A user, a third party app and a webservice with data. That app wants access to your data and boy is it gonna have to work hard to get it:

20140215-225821.jpg

To do so it will resort to a secret handshake. A few actually…well it’s a whole ritual really. Let’s review something called encryption. We all had secret decoder rings, right?! That’s the foundation for simple or symmetric encryption.

Along comes PKI or Public Key Infrastructure for Encryption and it basically splits up the decoder ring into two rings. One is public and the other is private. This is basically what it looks like:

20140215-230727.jpg

Take a look at these great videos for a better understanding of PKI:

The tennis ball & lego ones remind me of that riddle of how to get a chicken, a sack of seeds and a wolf across a river on a boat. You cross the chicken first, cause the wolf has no interest in the seeds. Then you take over the seeds but bring back the chicken. Now you take the wolf over while leaving the chicken alone. Finally you go back for the chicken!

Ok so how does this fit into OAuth? Well I think this is what happens:

20140215-231635.jpg

The user runs the third party app which will try to talk to Facebook on his behalf. So it must first do a PKI dance to prove that IT (the 3rd party app) is speaking on the user’s behalf. To do so it uses a consumer key & consumer secret to gain an UN-authorized Request Token.

Now the user is presented with a Consent Form and if the user accepts, that token is now converted into an Authorized Request Token. I’m not sure if this requires another PKI dance but let’s say it does cause 3 is a nice number!

Finally, with that Authorized Request Token in hand, the 3rd party app makes a new request to the webservice for a shiny new Access Token which contains the specifics of what this 3rd party app Can and Cannot do! After this final PKI dance, that Access Token can be used to make API calls on the server.

20140215-232628.jpg

I’ll post back with edits when I clear up the details!

Blocks & Completion Handlers

Blocks in iOS for Completion Handlers by Marcio Valenzuela Santiapps.com

Think of blocks as c functions:

(return type)functionName(input1, input2) { input1 + input2 }

and you call it like this:

return type = functionName (1,2)

Blocks are similar:

NSInteger (^mathOperation)(NSInteger x, NSInteger y) = ^NSInteger(NSInteger x,NSInteger y){ return x + y; };

You call it like this:

NSInteger sum = mathOperation(1,2);

Now imagine how cool it is to, instead of just passing a value to a method (like saying: here is a value, evaluate it), you can pass a whole method to it (like saying: here is something else to do!). Or better yet, here do this but only when you finish doing that! Like, load the users posts or tweets after you finish authenticating him! This is the called method:

-(void)countToTenThousandAndReturnCompletionBLock:(void (^)(BOOL))completed{

int x = 1;

while (x < 10001) {

NSLog(@”%i”, x); x++;

}

completed(YES);

}

This method takes a block and that block takes a Boolean.

And this is the calling method:

NewSimpleCounter *newSimpleCounter = [[NewSimpleCounter alloc] init];

[newSimpleCounter countToTenThousandAndReturnCompletionBLock:^(BOOL completed){

if(completed) {

NSLog(@”Ten Thousands Counts Finished”);

}

}];

So we call the method and say to it:

“Count to 10,000 and when you are done, here is a block to execute”. So it counts and when it’s done, it sends YES to the block. Then it evaluates the block and since it’s yes, it completes!